Top 10 Hidden Spots on Dust 2 You Never Knew About
Dust 2 is one of the most iconic maps in the Counter-Strike series, but while many players are familiar with the main pathways and common strategies, there are hidden spots that can give you a tactical advantage. These locations are often overlooked and can be used for ambushes or strategic retreats. In this article, we will uncover the top 10 hidden spots on Dust 2 that you never knew about, helping you elevate your gameplay and surprise your opponents.
- Back of A Site: Nestled behind the boxes on the A site, this spot allows for surprise plays against unsuspecting attackers.
- Double Doors Sneak: Players can hide in the shadows at the double doors on Mid to avoid detection while waiting for an enemy team to pass by.
- Catwalk Corner: A little-known corner close to the junction of A site and catwalk can give you the edge in a firefight.
- Lower Tunnels: The hidden corners in lower tunnels can be perfect for flankers looking to catch opponents off-guard.
- Goose Position: Often overlooked, the Goose spot on A site can provide cover and excellent vantage.
- B Tunnels Exit: Hiding just outside the B tunnels can surprise your enemies as they push forward.
- Platform Behind B: The raised platform behind B site can be a great ambush location against attackers.
- Great Wall: Sneaking along the wall near T Spawn can allow players to flank from behind during critical rounds.
- Invisible Corner: This almost invisible spot near the A Ramp can make it hard for enemies to spot you.
- CT Spawn Hide: The dark corner in CT Spawn can allow a strategic defender to hold the site effectively.
Counter-Strike is a highly popular tactical first-person shooter that has evolved significantly since its inception. Players compete in teams to complete objectives, such as defusing bombs or rescuing hostages. For those looking to enhance their gameplay experience, exploring different cs2 launch options can be beneficial, helping to optimize performance and tailor settings to individual preferences.
The Ultimate Guide to Dust 2 Callouts for Effective Team Communication
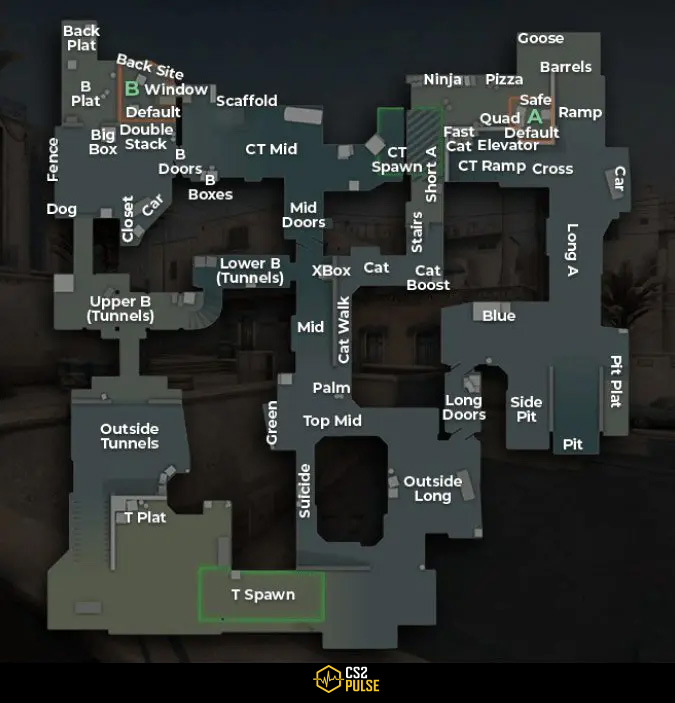
In the fast-paced world of Counter-Strike: Global Offensive, effective team communication can be the difference between victory and defeat, especially on the popular map Dust 2. Understanding and using the standard callouts can significantly enhance your team's coordination and strategy. This guide will provide you with the essential callouts for each area of Dust 2, ensuring that you can quickly relay information to your teammates during crucial moments of gameplay. From Catwalk to Long A, knowing these locations will help streamline your communication and ultimately lead to more successful rounds.
To maximize your gameplay experience, it is vital to familiarize yourself with key callouts. Here are some important locations you should know:
- Mid: The central area of the map, a common pathway for both teams.
- Long A: The long corridor leading to the A bombsite; often a hotspot for engagements.
- Short A: The shorter path to the A site, providing a quick access route.
- B Site: The bomb site located on the lower left side of the map.
- T Spawn: The starting point for the Terrorist side.
By incorporating these callouts into your communication, your team can respond more effectively to enemy movements and execute strategies with precision.
How to Dominate Dust 2: Strategies for Every Bomb Site
Dust 2 is one of the most iconic maps in the Counter-Strike series, and mastering its intricacies is essential for dominating the competition. To excel on Dust 2, players must develop strategies tailored to each bomb site—A and B. When attacking the A site, it's crucial to employ utilities effectively. Smoke grenades can obscure vision from CT spawn and Goose, while flashbangs can blind opponents holding Site or Catwalk. Coordinating a well-timed push is key, allowing your team to overwhelm defenders and secure the site.
Defending on Dust 2, especially at the B site, requires keen awareness and positioning. To maximize effectiveness, players can utilize crossfires by having one player near Bench and another closer to Site. It's also vital to have a designated AWPer hold angles that can quickly stop potential pushes from Trop or Mid. Adapting your playstyle based on enemy trends is important; if the opposing team frequently rushes B, consider stacking players there or using a decoy to fake a response.